

Oct. 10, 2026
Can seaming failure is one of the most common problems encountered when operating a can seaming machine. Scratched can lids, uneven sealing, narrow sealing curls, excessive seam gaps, curved can ends, incomplete sealing, and abnormal can release can all affect package integrity and production efficiency.
In most cases, can sealing problems are related to the adjustment of the first-operation seaming roller, second-operation seaming roller, seaming chuck, can tray, lifting mechanism, or roller return system.
This guide explains the most common can seaming problems, their possible causes, and troubleshooting methods, helping machine operators and packaging engineers identify sealing failures more quickly and improve can seam quality.
The troubleshooting recommendations in this article are based on the supplied machine troubleshooting tables.
What Is a Can Seaming Machine?
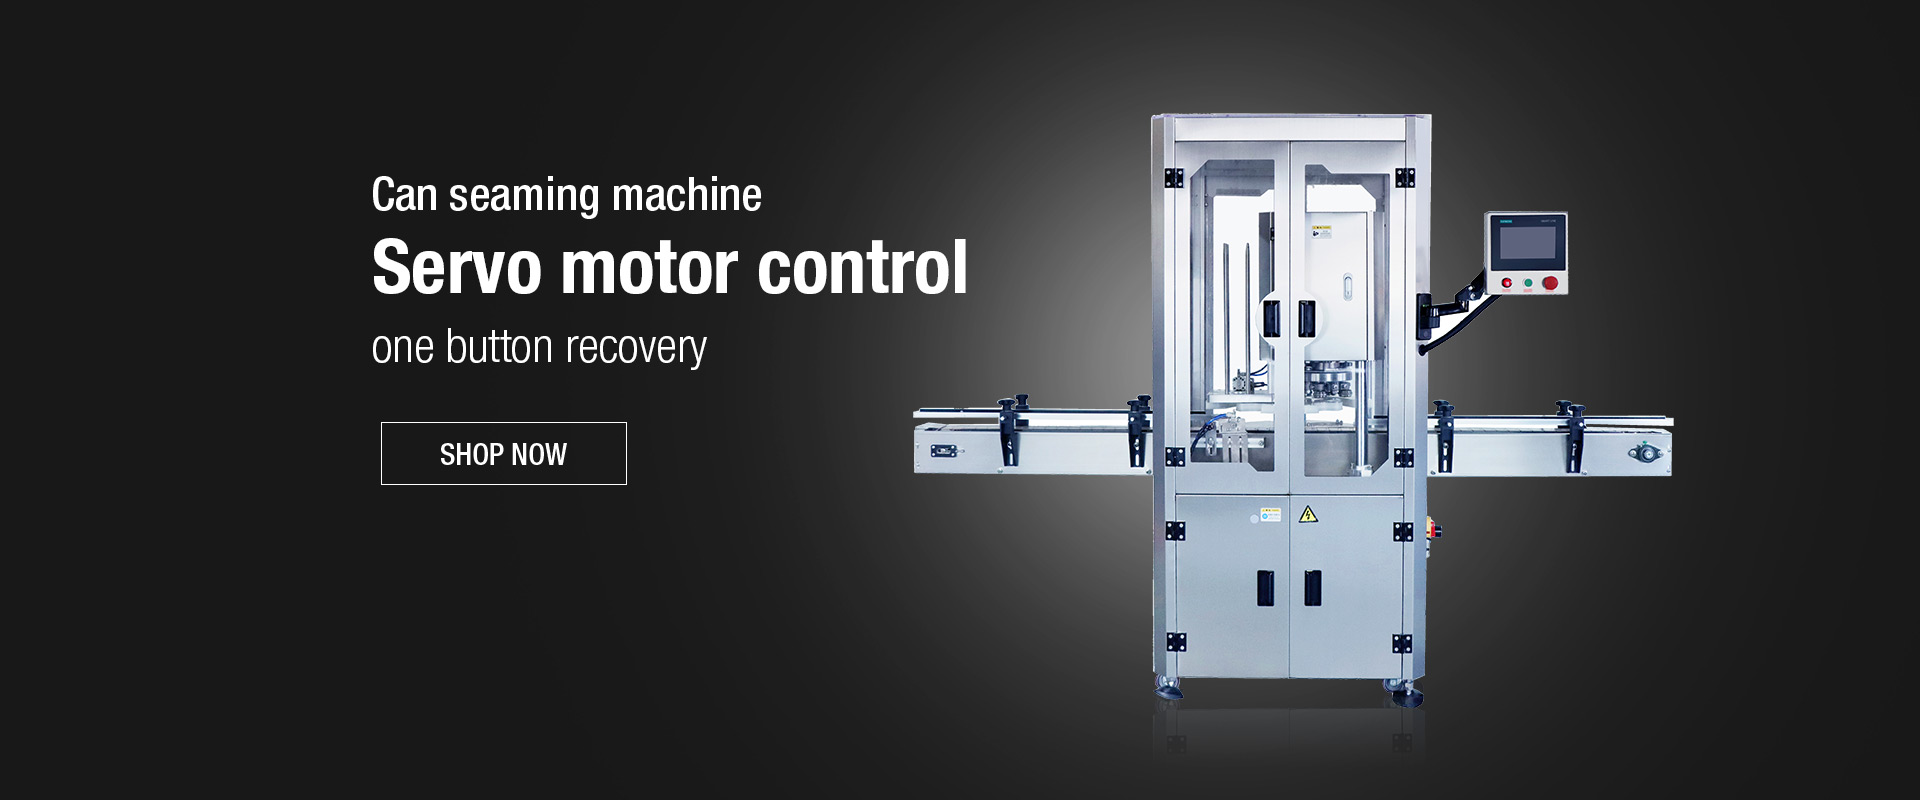
A can seaming machine, also called a can seamer or can sealing machine, mechanically joins a can body and can end by forming a double seam.
During the seaming process, the can is positioned against the seaming chuck, while one or more seaming rollers form the seam in successive operations. The first and second operations have different functions, so the position and pressure of each seaming roller are critical to final seam quality.
The can tray or lifting mechanism also plays an important role. If the can is too high, too low, or not correctly centered under the chuck, the seaming rollers may not contact the can end correctly.
Therefore, when a can seamer produces an abnormal seam, operators should not immediately replace parts. The first step should be to identify whether the problem is related to:
First-operation seaming roller adjustment
Second-operation seaming roller adjustment
Seaming chuck position
Can centering
Can tray height
Can lifting stroke
Seaming roller return mechanism
Motor or electrical system
Common Can Seaming Problems and How to Fix Them
1.Can Lid Top Creases, Scratch Marks & Sharp Edges
Problem :
The top of the can lid has visible scratches, sharp edges, or raised areas after seaming.
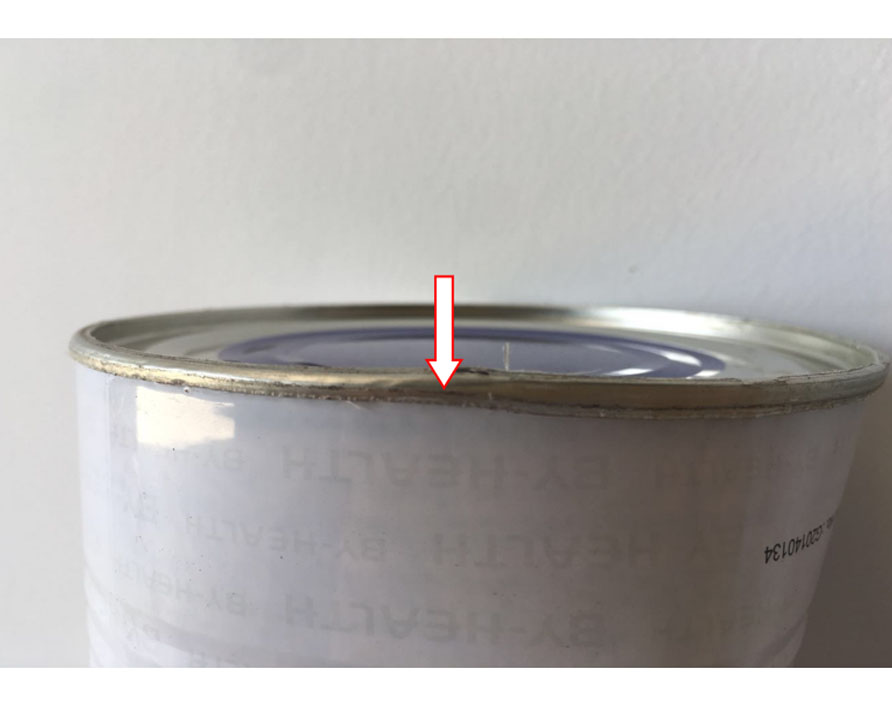
Possible Cause:
The second-operation seaming roller is adjusted too low, causing excessive contact or pressure during the final seaming operation.
Troubleshooting Solution:
Slightly raise the second-operation seaming roller and test several cans again.
The adjustment should be made gradually rather than making a large change at once. After adjustment, inspect the seam and verify that the lid is formed evenly without excessive pressure marks.
2.Can Lid Surface Pressed Flat with Scratches
Problem :
The lid surface is pressed flat and has obvious scratch damage after sealing
Possible Cause:
The second-operation seaming roller is too close to the seaming chuck. This can create excessive mechanical pressure between the roller, can end, and chuck.
Troubleshooting Solution:
Move the second-operation seaming roller slightly farther away from the chuck.
After adjustment, run a small number of test cans and check the seam appearance before returning to full production.
3.Small Footprints or Dots on the Can Seam
Problem :
Small footprints, dots, or abnormal marks appear on the sealing area.
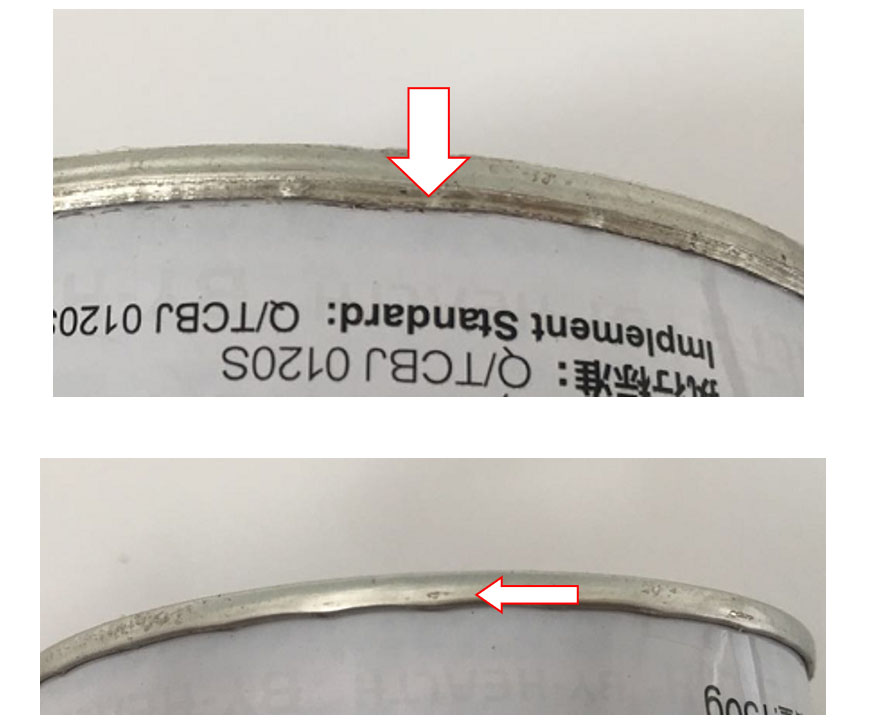
Possible Cause
The first-operation seaming roller is too far away from the chuck
Troubleshooting Method
Move the first-operation seaming roller slightly closer to the chuck.
The first operation is particularly important because it establishes the initial seam formation. If its position is incorrect, the second operation may not be able to correct the seam completely.
4.Uneven Sealing Quality (One Side Good, One Side Abnormal)
Problem :
One side of the can has a good sealing effect, while the opposite side has abnormal sealing quality.
This is a particularly important troubleshooting symptom because the problem may not originate from the seaming roller.
Possible Cause
The can is not centered correctly with the chuck, or the tray locking screw is loose.
If the can is not correctly positioned under the chuck, the roller-to-can relationship can differ around the circumference.
Troubleshooting Method
Check the can position and tray.
Make sure:
- The can is centered under the chuck.
- The tray is correctly positioned.
- The tray locking screw is tight.
- The can is stable during the seaming operation.
Important Troubleshooting Principle
If one side of a can has good seam quality and the other side is abnormal, check can centering before changing the seaming roller adjustment.
This is a useful diagnostic principle for can seamer operators.
5.Sealing Curl Is Too Narrow and Seam Gap Is Too Large
Problem :
The sealing curl is narrow and the seam gap is larger than expected.
Possible Cause
The second-operation seaming roller is positioned too high relative to the chuck.
Troubleshooting Method
Slightly lower the second-operation seaming roller.
After adjustment, inspect the sealing curl and seam around the entire can.
Related Search Terms
- can seam gap too large
- can seam curl too narrow
- can seaming roller adjustment
- can seamer seam problem
- can sealing machine seam adjustment
6.Uneven or Bent Seaming Curl
Problem :
The sealing curl is not flat and appears curved or uneven.
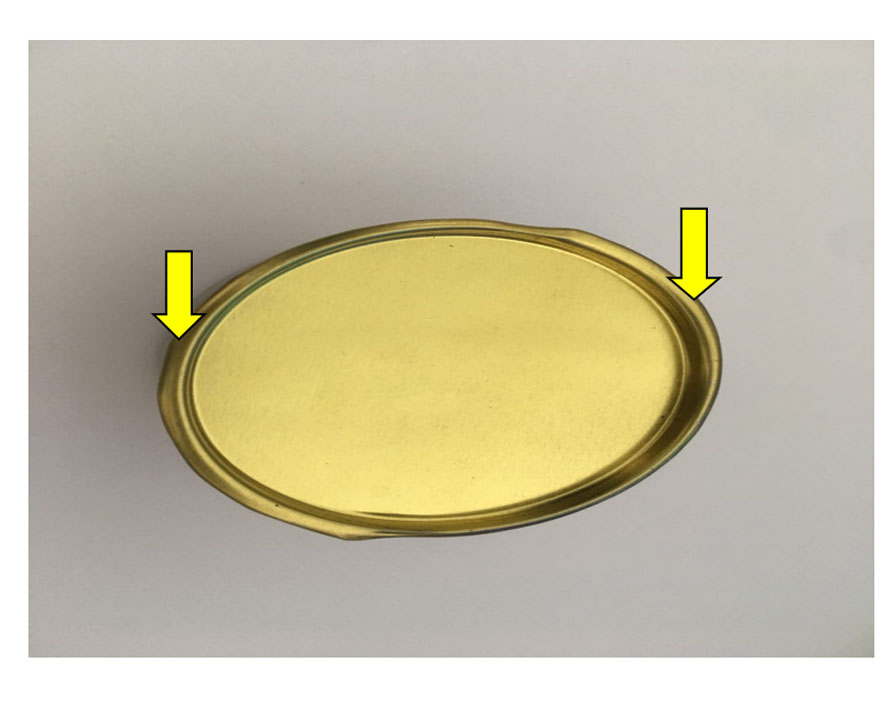
Possible Cause:
The can tray is too low, and the can has not been lifted high enough during the seaming process.
The tray height and lifting stroke determine the position of the can relative to the chuck.
Troubleshooting Method:
Depending on the machine configuration:
- Slightly increase the tray height;
- Lower the overall seaming head; or
- Increase the lifting stroke of the tray ascending cylinder.
The objective is to ensure that the can is lifted to the correct position during seaming.
7.Can stuck ,Can Does Not Automatically Drop After Sealing
Problem :
After the sealing process is completed, the can does not automatically fall or release from the seaming position.
Possible Cause
The tray height is too high, resulting in excessive can lifting.
Troubleshooting Method
Slightly lower the tray to reduce the lifting-cylinder stroke.
The can should be held securely during sealing but released smoothly after the sealing cycle.
8.Unstable Sealing Quality; Poor Seaming Roller & Chuck Gap Adjustment
Problem:
The sealing quality varies, and the distance between the seaming roller and chuck cannot be adjusted correctly.
Possible Causes
The supplied troubleshooting table identifies several possible causes:
- The can lid does not properly match the chuck.
- The chuck is incorrectly positioned.
- The chuck is too small.
- The lid is not fully inserted into the correct position.
Troubleshooting Method
Check the chuck and can-end specification.
If a new chuck has been installed, rematch and correctly position the new chuck.
Why Chuck Matching Matters
The chuck provides the internal support and reference position during the seaming operation.
Therefore, even if the seaming roller is correctly adjusted, an incorrect chuck can still result in poor or inconsistent sealing.
9.One Side of the Sealing Curl Is Good but the Other Side Has a Breach
Problem:
The sealing curl is intact on one side but has a breach or opening on the other side.
Possible Causes
The seaming roller return mechanism may not be operating normally.
Possible causes include:
- Insufficient return-spring tension
- Seaming roller shaft too tight
- Abnormal roller rotation
- Abnormal roller return movement
Troubleshooting Method
Inspect the seaming roller return mechanism.
Check the:
(1).Return spring
(2). Roller shaft
(3). Roller rotation
(4). Lubrication
(5). Return movement
If the return spring has insufficient tension, replace it. Add suitable lubricant where required.
Can Seaming Failure Troubleshooting Table
Sealing Failure | Possible Cause | Troubleshooting Method |
Scratches or sharp edges on can lid | Second roller too low | Slightly raise second roller |
Can lid pressed flat and scratched | Second roller too close to chuck | Move second roller farther away |
Small footprints or dots | First roller too far from chuck | Move first roller closer |
One side good, other side abnormal | Can not centered / tray loose | Check center and tighten locking screw |
Sealing curl too narrow | Second roller too high | Slightly lower second roller |
Seam gap too large | Incorrect second-operation adjustment | Adjust second roller |
Sealing curl curved | Tray too low / insufficient lifting | Adjust tray or lifting stroke |
Can does not drop after sealing | Tray too high | Lower tray |
Inconsistent seam quality | Chuck mismatch or incorrect position | Rematch the chuck |
One side of curl has a breach | Abnormal roller return | Check spring, shaft and lubrication |
How to Troubleshoot a Can Seaming Machine Correctly
When a can sealing machine has a sealing problem, the best approach is to troubleshoot from the finished product back to the machine components.
Step 1: Inspect the Seam
First look carefully at the finished can.
Ask:
- Is the lid scratched?
- Is the lid excessively flat?
- Is the seam curl too narrow?
- Is the seam gap too large?
- Is the curl curved?
- Is one side different from the other?
- Is there a breach?
- Does the can remain stuck after sealing?
The visual symptom can help identify the likely mechanical cause.
Step 2: Check the Can Centering
If the sealing quality is different on opposite sides of the can, check the can's position first.
Inspect the:
- Can tray
- Tray locking screw
- Chuck
- Can lifting position
A loose tray or incorrect centering can cause uneven sealing.
Step 3: Check the First-Operation Roller
If there are small footprints or dots on the seam, inspect the first-operation roller.
A roller that is too far away from the chuck may need to be moved slightly closer.
Step 4: Check the Second-Operation Roller
The second-operation roller should be checked when there are:
- Scratches
- Sharp edges
- Excessive flattening
- Narrow sealing curls
- Excessive seam gaps
Small adjustments should be made gradually.
Step 5: Check Tray Height
If the sealing curl is curved or the can does not release after sealing, inspect the tray height and lifting stroke.
The can must reach the correct position against the chuck during sealing.
Step 6: Check the Chuck
If roller adjustment cannot produce consistent results, check whether the chuck correctly matches the can end.
A mismatched chuck can cause unstable seam formation even when the roller adjustment is correct.
Step 7: Inspect the Seaming Roller Return System
If one side of the seam is intact and the other side has a breach, inspect the roller return mechanism.
Check the return spring, shaft movement, lubrication, and roller rotation.
Why Can Seaming Roller Adjustment Is Critical
The distance between the seaming roller and chuck directly affects how the can end is formed.
If the roller is too close:
Excessive pressure → scratches → deformation → abnormal seam
If the roller is too far away:
Insufficient contact → incomplete formation → poor seam quality
This is why adjustments should normally be made gradually, with test cans checked after each adjustment.
A professional operator should avoid changing the first roller, second roller, tray height, and chuck position simultaneously because it becomes difficult to determine which adjustment actually solved the problem.
How to Prevent Can Sealing Failure
Correct machine adjustment is only part of maintaining stable can seam quality. Preventive maintenance is also important.
1. Check Seaming Rollers Regularly
Inspect the first and second rollers for wear, abnormal movement, or contamination.
2. Check the Chuck
Make sure the chuck matches the can end and is correctly positioned.
3. Check Tray Position
Inspect the tray locking screw regularly to prevent the can from shifting away from the correct center point.
4. Maintain the Lifting Mechanism
Check tray height and cylinder stroke to ensure the can reaches the correct sealing position.
5. Lubricate Moving Components
The seaming roller return mechanism should move smoothly. Insufficient lubrication can affect roller movement and seam consistency.
6. Make Small Adjustments
Avoid large changes to roller positions. Make small adjustments and verify the results using test cans.
Can Sealing Failure FAQ
Why does my can seaming machine scratch the lid?
The second-operation seaming roller may be too low or too close to the chuck. Slightly raising or moving the roller away from the chuck can help correct the problem.
Why is my can seam uneven on one side?
Check whether the can is centered correctly under the chuck. A loose tray locking screw can cause the can to shift and produce different seam quality on opposite sides.
Why is my can seam gap too large?
A second-operation seaming roller that is incorrectly positioned can cause an excessive seam gap. According to the supplied troubleshooting table, a second roller positioned too high should be slightly lowered.
Why is the sealing curl curved?
The can tray may be too low, resulting in insufficient lifting of the can during seaming. Check the tray height and lifting-cylinder stroke.
Why does the can not fall after sealing?
The tray may be too high, causing excessive lifting. Slightly lower the tray to reduce the cylinder lifting stroke.
Why does one side of the can seam have a breach?
Check the seaming roller return mechanism. Insufficient spring tension, a tight roller shaft, abnormal roller rotation, or insufficient lubrication may affect the seam.
Why is my can seamer difficult to adjust after changing the chuck?
The new chuck may not be correctly matched to the can lid, or it may not be correctly positioned. Rematch and correctly position the chuck before making further roller adjustments.
Conclusion
Effective can seaming machine troubleshooting starts with identifying the exact symptom rather than randomly adjusting machine parameters. Problems such as scratched lids, uneven seams, narrow curls, large seam gaps, curved curls, can-release problems, and one-sided breaches can often be traced to the relationship between the seaming roller, chuck, can tray, and lifting mechanism.
When troubleshooting a can seamer, start with the appearance of the finished seam. Scratches and sharp edges usually point toward excessive second-operation roller contact, while small footprints may indicate incorrect first-operation roller positioning. Uneven sealing from one side to another should prompt a check of can centering and tray stability. Curved curls and can-release problems require inspection of tray height and lifting stroke.
For manufacturers using automatic can seaming machines, vacuum can seamers, nitrogen flushing can seamers, food can seamers, beverage can seamers, pet food can seamers, or powder can sealing machines, correct tooling selection and professional machine adjustment are essential for achieving stable and repeatable sealing quality.
If you are looking for a can seaming machine for food cans, beverage cans, pet food cans, powder cans, vacuum cans, or nitrogen-flushed cans, the machine should be selected according to the can diameter, can material, can end type, product characteristics, required production speed, and sealing requirements.
Guangzhou Full Harvest specializes in automatic can seaming machines, vacuum can seamers, nitrogen flushing can sealing machine, can sealing machines, capping machines, filling machines, labeling machines, and complete packaging lines.
No.3 Gongye South Road,Mingzhu Industrial Park,Conghua District ,Guangzhou City 510900,China
+86 20 3751 0321
FOLLOW US


Tel/ Fax: +86 20 3751 0321
E-mail: sales@gzfharvest.com
Add: No.3 Gongye South Road,Mingzhu Industrial Park,Conghua District ,Guangzhou City 510900,China